Winterizing Outdoor Tankless Water Heaters in Cold Climates
Cold weather poses serious risks to outdoor tankless water heaters. When temperatures drop below freezing, water inside the unit can freeze and expand, cracking heat exchangers, damaging valves, and rendering the entire system useless. You’ve likely seen the aftermath: burst pipes, water damage, and costly emergency repairs that could have been prevented with proper winterization.
Outdoor tankless units are particularly vulnerable because they lack the insulation and ambient heat that indoor models benefit from. This guide walks you through the essential steps to winterize outdoor tankless water heaters in cold climates.
Understanding Freeze Risks in Outdoor Tankless Systems
Outdoor tankless water heaters face unique challenges compared to their indoor counterparts. As we mentioned, the units are exposed to wind chill, precipitation, and sudden temperature drops that can turn standing water into ice. Additionally, the compact design that makes tankless systems so efficient also means there’s less thermal mass to resist freezing.
Freeze damage occurs when water trapped in the heat exchanger, pipes, or valves expands as it solidifies. This expansion creates pressure that cracks copper tubes, splits fittings, and compromises seals.
Critical Components at Risk
Several parts of a tankless system are especially vulnerable during winter:
- Heat exchanger: The primary component where water flows through narrow passages that can crack when frozen.
- Inlet and outlet connections: Water trapped at these junctions freezes first, potentially damaging threaded connections.
- Pressure relief valve: Residual water in the valve body can freeze and prevent proper operation.
- Bypass valves: Service valves used for maintenance can trap water and freeze if not drained.
- Internal sensors: Temperature and flow sensors contain small amounts of water that expand when frozen.
- Gas valves and electronic components: Moisture condensation can freeze and damage control boards.
Step 1: Drain the System Completely
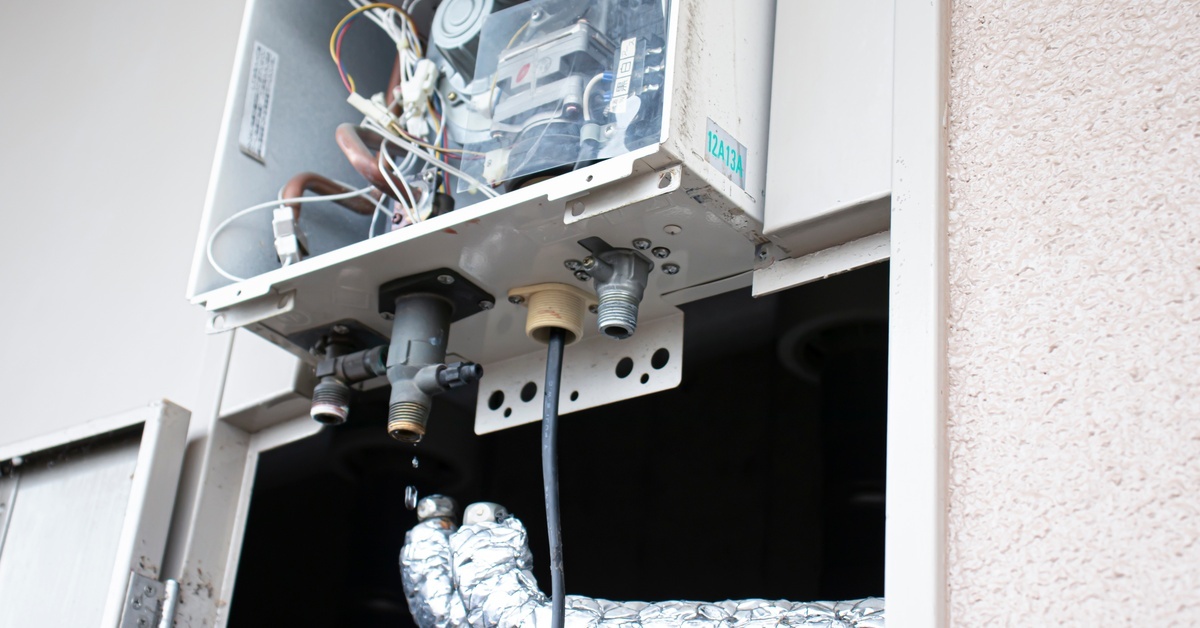
Complete drainage is the foundation of effective winterization. Simply shutting off the water supply isn’t enough because residual water remains in the heat exchanger and various components throughout the system.
Start by turning off the gas supply and electrical power to the unit. Next, close the cold water inlet valve and open the hot water outlet valve. This creates an air path that allows water to drain more effectively. Locate the drain valves at the bottom of the unit—most outdoor models have two or three drain ports specifically designed for winterization.
Attach a garden hose to each drain valve and direct the water to an appropriate drainage area. Open the drain valves slowly and allow gravity to do most of the work. However, gravity alone won’t remove all the water, particularly from horizontal sections of the heat exchanger.
Step 2: Use Compressed Air for Thorough Drying
After gravity drainage, use compressed air to blow out remaining water. Connect an air compressor to the drain ports, keeping the pressure below 50 PSI to avoid damaging internal components. Short bursts of air work better than continuous pressure because they create turbulence that dislodges water droplets clinging to surfaces.
Work systematically through each drain port, alternating between the inlet and outlet sides. You’ll know you’ve removed most of the water when only dry air exits the opposite ports. Don’t forget to blow out the pressure relief valve and any service valves that might trap water.
Step 3: Install Insulation and Weather Protection
Proper insulation provides an additional layer of defense against freezing temperatures. Even after draining, some moisture inevitably remains in the system, and insulation helps prevent that moisture from reaching freezing temperatures during brief cold snaps.
Wrap exposed pipes with foam pipe insulation rated for outdoor use. Pay special attention to the first few feet of piping on both the inlet and outlet sides because these sections are most exposed to cold air. Moreover, use weatherproof tape or zip ties to secure the insulation because wind can quickly displace loose wrapping.
The unit itself benefits from an insulated cover designed specifically for your model. Generic covers may block vents or trap moisture, so stick with manufacturer-approved options when available. These covers typically feature ventilation openings that prevent condensation buildup while still providing thermal protection.
Step 4: Integrate Additional Weatherproofing Measures
Consider these supplementary protection methods:
- Wind barriers: Install temporary panels or screens to block prevailing winds from directly hitting the unit.
- Moisture barriers: Apply waterproof sealant around pipe penetrations to prevent water infiltration.
- Heat tape: For areas with extreme cold, heat tape on supply lines provides active freeze protection.
- Recessed mounting: When installing new units, choose locations with natural wind protection like alcoves or covered areas.
Step 5: Activate Freeze Protection Features
Modern outdoor tankless water heaters include built-in freeze protection, but these systems only work when the unit has power and water flow. Understanding how these features operate helps you decide whether you can rely on them or need to take additional winterization steps.
Most freeze protection systems monitor internal temperature and activate a small heating element or circulate water through the heat exchanger when temperatures approach freezing. This active protection works well during occupied periods when the unit remains connected to power and water, but it’s not a substitute for proper winterization during extended shutdowns.
Check the specific model’s freeze protection specifications because capabilities vary widely. Some units protect down to -22°F (-30°C) when powered, while others only handle brief dips just below freezing. Additionally, freeze protection typically draws 50-150 watts continuously during cold weather, adding to energy costs.
Step 6: Recommend Regular Mid-Winter Checks
Winterization isn’t a one-time task. Periodic inspections throughout the cold season help catch problems before they cause damage. Suggest to your clients that they schedule checks after major weather events, prolonged cold snaps, and at least once monthly during winter.
During each inspection, check for the following:
- General condition: Look for ice, frost, or moisture around the unit and connections.
- Cover integrity: Verify that protective covers remain properly secured and undamaged.
- Drain valve status: Confirm all drain valves remain closed to prevent water entry.
- Power status: Check that electrical connections remain dry and properly sealed.
- Ventilation: Verify that air intake and exhaust vents aren’t blocked by snow or ice.
Keep Your Clients’ Systems Protected Year-Round
Winterizing outdoor tankless water heaters in cold climates prevents costly freeze damage for your clients. The techniques covered here work together to safeguard equipment through the harshest conditions.
Whether you’re installing a new tankless water heater or need tankless water heater parts to repair a client’s system, get everything at 24 Hour Supply. Our products deliver the quality that technicians appreciate and the dependability that your clients look for.
Recent Posts
-
What Causes Pipe Corrosion?
Pipe corrosion occurs when metal reacts with water, oxygen, and minerals over time. Factors that spe …Feb 2nd 2026 -
Commercial vs. Residential Plumbing: 15 Key Differences You Need to Know
Plumbing might seem straightforward at first glance, but residential and commercial systems are fund …Feb 2nd 2026 -
What Is a Circulator Pump and How Does It Work?
Water needs to keep moving efficiently in plumbing and HVAC systems, and that’s where a circulator p …Feb 2nd 2026


